
Uncategorised
DL6YCL - Yet Another Twin-Turn - Helix antenna for QO-100
I started using QO-100 in RX mode, with just the Bullseye LNB and 80cm dish and had good results pulling in signals from the Geostationary Satellite, however when I then added the POTY, and the LNB adaptor, etc the signal dropped off, especially on heavy cloud days. Clear skies were passable, but with a number of changes made and measurements taken, there was only so much I could do to get a signal that was workable, especially on SSB.
I had thought about the various Helix options from speaking to a number of stations who had a helix (from 2 turns to 3.5 turns) and how their signal presented to the satellite. Then came a chance google search which brought me to the extensive QRZ page of DL6YCL
Initially, this is being built for a Triax TDS80 dish (80cm, steel off-set) but could be moved on to the 1.2m Andrews Polar Mounted dish should I need the increased signal level. The 1.2m dish, however is used for International TV/Radio reception and therefore only a temporary measure unless I can find another larger dish !
Build
I started by collecting and printing the parts needed for the helix. I needed to order the Nylon bolts, Brass Plate and an N-Type connector. I already had in-stock what I thought would be good enamel coated copper wire.
Assembly
Calibration
Results
Building a USB CW Paddle adaptor for QO-100
As my station uses the SDR Console / ADALM Pluto design, adding CW to my station is not as straight forward as putting a key on a radio and selecting CW mode. I therefore set about some research and built an interface between my Begali Sculpture Paddle and SDR Console.

Finished USB Paddle Key adaptor in 3D printed case, with Begali Sculpture Paddle.
SDR console has no provision currently for the addition of a CW Key or paddle, however there are a number of apps out there that can produce the audio output from a key/paddle when wired to 2/3 pins on a 9-pin serial port. Whilst I have an abundance of Serial ports on my Shack PC, I wanted this as a self-contained device that I can use on any PC.
Parts
- FTDI Mini-USB RS232 adaptor (3.3/5v) - Ebay - £3.45 - Link
- 3.5mm Jack Plug - Rean - £2.34
- 50cm 3 Core Cable wire - £2.00
- Heatshrink
- 3D printed case (STL's coming soon)
- Morse Keyer 4.3 Software
The build of this is very simple, with the first job being the de-soldering and removal of the angled pins on the FTDI board as they are in the way and we are not going to use them. These are for its intended purpose as a ESP8266 programmer.
next, the wiring we need is to have Ground (Yellow - Shield) to CTS (Blue) for a Dah (Ring), and Ground to DSR (Green) for a Dit (Tip), thus the appropriate pins need to be soldered to the 3 way headphone cable and terminated on the 3.5mm jack plug with CTS on the ring, DSR on the tip and GND on the Shield.
Above References for 3.5mm jack plug (TRS - Tip, Ring Shield)

Closeup of FTDI board and wires - Stray shield now tidied up.
Once this is completed, connect the USB cable to your PC. Windows 10 may fins the driver, or you may need to self install it as a Serial converter.
A serial port number will be allocated, in my case COM14.
Install Morse Keyer 4.3 and select port 14, and tick the use Serial box.
Select a sound output that you can hear, via speakers.

Morse Keyer 4.3 software
Try the paddle to check that it functions as expected.
then In Morse Keyer 4.3, select output to be Virtual Patch Cable as above.
Open SDR console, on the TX panel, select your Virtual Patch Cable as the source.
In SDR console, select USB as the mode.
Enable transmit on SDR Console and key your callsign and TEST, checking that it comes back as expected. With the efficiency of CW, you may want to lower your power settings.
Now you can work on handling the delay of hearing your dits 2 seconds after you sent them !
You are now on QO-100 with CW !
Time lapse Sky Camera - Pointing 60 degrees (North East)
Press > to play the current day
Yearly Time-lapse video
Press > to play the current day
Antennas supporting the M1VPN station are :
- 80m, 40m, 30m, 20m, 15m, 10m - Hustler 6BTV DX Vertical (fed with DX Engineering VFCC H05 Balun) - See Hustler 6BTV
- Fritzel FD4 based Offset Centre-fed Dipole (OCFD), 80m - 6m, 133ft long, 35ft above ground. Installed with a DX Engineering 4:1 Balun and DXE Feedline Choke Balun - See OFCD Dipole
- Solarcon A99 - WARC Bands and 10m.
- Watson V-2000 Co-linear 6/2/70cm Vertical
- 4m Folded Dipole Antenna - Moonraker
- 6m Yagi 3-ele - Moonraker
- Unified Microsystems Bevflex-4X - Beverage on Ground
HF and VHF Antennas are fed with Messi + Paoloni Ultraflex10 Coaxial Cable and terminated with M+P UHF and N-Type Connectors.
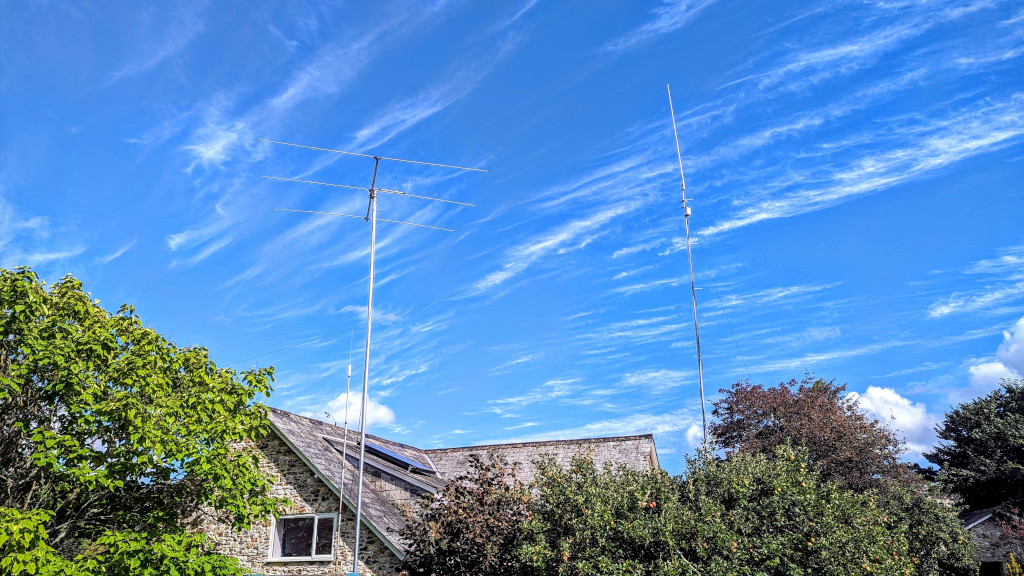 Photo 1 : Hustler 6-BTV (L), 3-ele 50Mhz Yagi (M), Watson V2000 VHF/UHF Vertical (R-Top) and DX-Engineering 4:1 Balun supporting an 80m OCFD (R-bottom) - (Summer 2023)
- QFH antenna (Home made Co-ax based) - NOAA Weather Satellites / VHF Receive - See NOAA WX
- Motorised 1.2m Channel Master Satellite dish with Polar Track mount (53E to 30W)
- 80cm Fixed dish with 4 x LNB - Sat TV/Radio (9E, 13E, 19.2E and 28.8E)
- 80cm Fixed dish with POTY and Bullseye LNB - QO-100 (25.8E)
Satellite Receive dishes utilise double shielded RG6/U 75 ohm Co-axial cable from CPC.
