
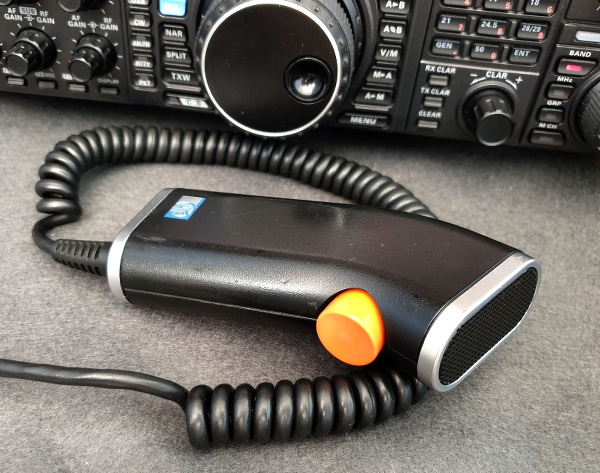
The Pye Shaver Mic, there's something about the form. Is it the reminder of the 1970's Professionals TV series (Ok, that was the PocketFone 8 but looks similar), or the fact that it looks like nothing else in the Radio world ? I don't know but when I saw such a thing exists I knew I wanted to have one as a functional microphone in my shack. Formerly made for Pye PMR sets, the configuration of the mic does not lend itself to the modern Yaesu, so some degree of engineering needed to be done but the aim was to re-use as much of the microphone as possible whilst making it a good FM Repeater Mic, maybe going further with some audio filtering to give SSB tailored audio too. Let's see how far it goes, but this has plenty of scope for expansion !
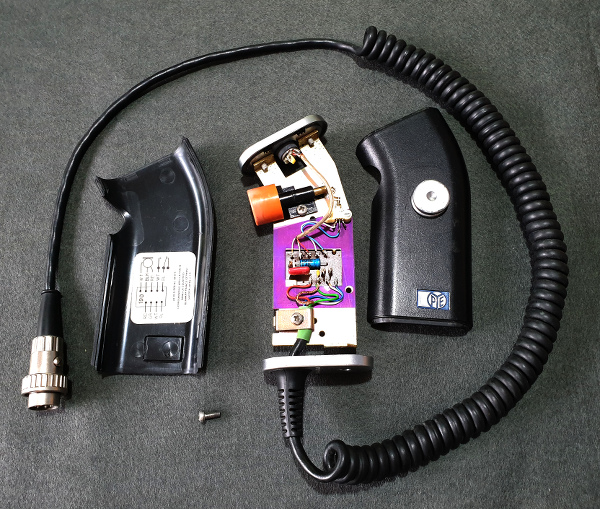
Fig. 1 Opened Pye Shaver Microphone
The Microphone
Purchased on Ebay for £15, it was in nice condition, 6/10 with lots of glue residue and well used plastic shell. The Orange button had faded to a lighter orange but the microphone grill was 9/10 and internally as new. Internally, the quality and feel is excellent as would be expected for an AM PMR in the 70's. Good gauge metal frame and well engineered PTT, switching and PCB mount. The Mic mount in rubber was in good condition too, holding a 10v, 10mm insert. 4 wire + shield curly cable terminating in a lock connector.
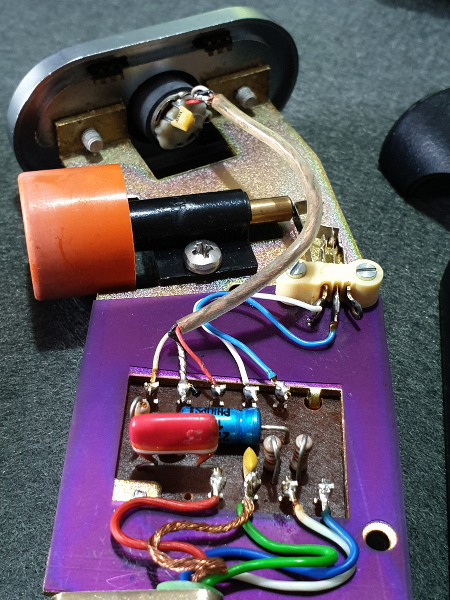
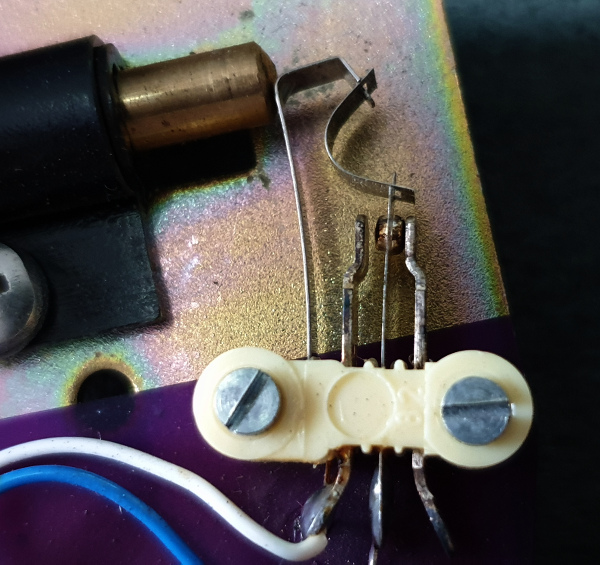
Fig. 2 & 3 Internal Pye Shaver Microphone highlights (PTT and PCB)
The Plan
Create a Electret, Powered Microphone for connection to a Yaesu Radio, taking inspiration from the MH-31 Modifications by M0UKD / M0GEO and other advice from across the internet on the use of Electret inserts. Main requirements are for good FM audio input, some filtering via passive components, and correct output level into the Mic stage of the radio (FT-847)
The Parts
Choosing an Electret insert sounds easier than it actually is. Do you go for a 50p, Cheap insert with no datasheet, or look at the Panasonic WM-range for a few Pounds. Based on the Buy Cheap, Buy twice principle the Panasonic route looked better. Now, Which one ? WM-3x, 5x or 6x ? Piling through the datasheets for these discontinued items it looked like the WM-62 was the most used in pro audio, and also had a good up to 10v performance. It was only 6mm though and the original mic holder was 9-10mm diameter. The WM-52 looked like it covered almost all the requirements, but then I could not source easily. The WM-54B was sourced, being the WM-52A with the legs soldered on. Whilst I didn't need the legs, the would help with the soldering if nothing else.
Oddly, I didn't have an 8.2k Ohm resistor, so a 10k and 47k in parallel made a good substitute.
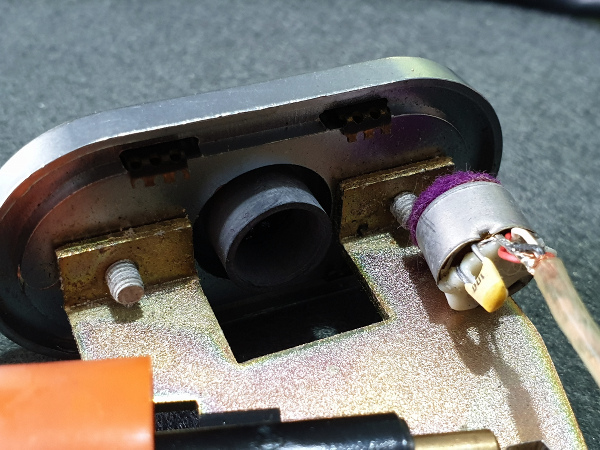
Fig.4 Pye Shaver Microphone bay (with microphone element removed)
The Circuit
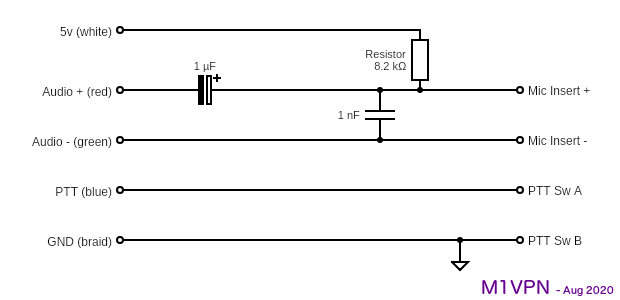
The circuit, based on the M0UKD MH-31 modification, the Panasonic WM-54B was connected as per the following diagram. The aim was to try to re-use the Pye PCB that is internal to the microphone, either by replacing the components and/or re routing tracks. Whilst I tried to realign the original PCB, it was such a lot of re-engineering and long traces that I thought that RF would become an issue, so the PCB was replaced with some strip board, cut to size and drilled to fit into the space.
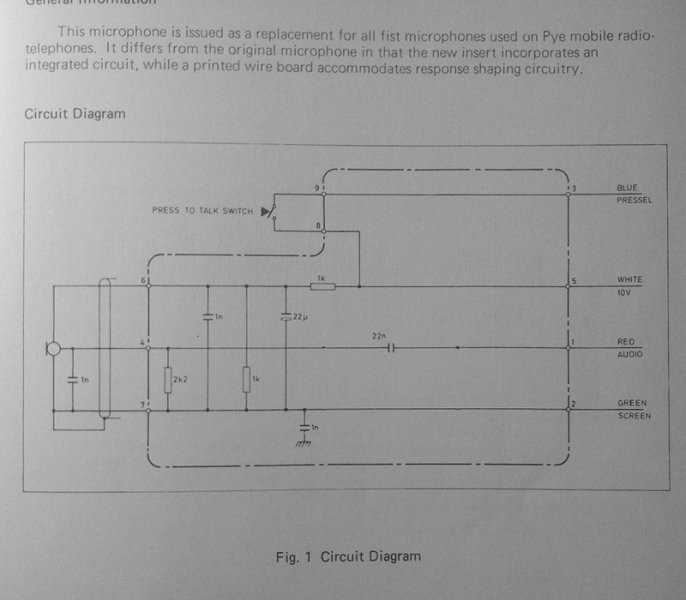
Fig. 5 Original Circuit Diagram for the Shaver Mic (From Pye Manual)
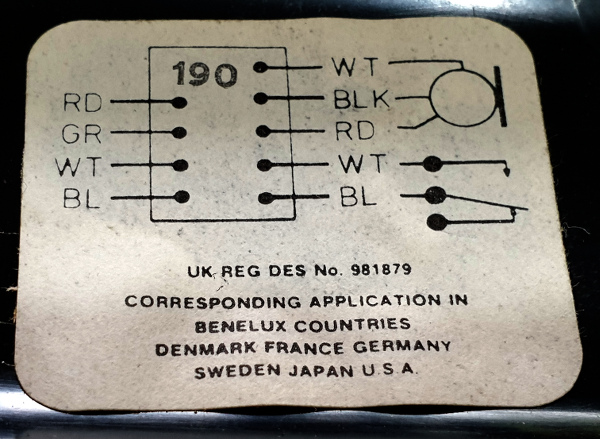
Fig. 6 Original Circuit Diagram inside the Shaver Mic.
| Wire Colour | Old Function | New Function | Yaesu Pin |
| White | 10v | 5v | 2 |
| Red | Audio + | Audio + | 8 |
| Blue | PTT | PTT | 6 |
| Green | GND | Audio - | 7 |
| Shield | GND | GND | 5 |
For PTT, the switch will now switch Pin 6 to ground pin 5, so the PCB trace will be cut and jumpered to GND.
The audio signal now will be passed out of Pin 8, (Mic +) and Pin 7, (Mic -) but will have a drop resistor for the incoming 5v, and a DC block capacitor.
The Circuit
The 8.2k Ohm resistor works in series as a voltage divider with the internal 2.2k Ohm resistance of the Insert, delivering 1v into the microphone element. The 1 uF capacitor filters the DC component and passes the audio signal into the radio via the curly lead.
The Finished PCB and Internal Wiring
The final PCB is here, where the circuit providing the Microphone supporting components and cross connection to the curly lead meet.
*** PCB Pic
This is a tidy install inside the microphone, and apart from the Yaesu 8-pin, there are no signs it's been converted into something else which was the plan. I suppose I could lay out a purpose built PCB for this, but the prices and numbers when I'd want 3 PCB's max seemed beyond reasonable. Strip board will do for now, and it's working. I've got the Gerber's if I change my mind though, or I have another PCB order going out.

Clean-up
I wanted to clean up the Orange PTT, it had broken down due to Sunlight, so I used the 3 grades of Novus Plastic Polish both manually and using a dremel mop. It cleaned up ok, but may keep an eye on getting another mic in better shape on Ebay in the future.
On-air Performance
In the excitement (No, I don't get out much) after metering out the circuit with the multimeter to check for shorts, dodgy soldering and stray wires, all was found to be good, and stable.
I then plugged in the microphone to the FT-847 for a few calls, with monitor switched on. First call into EA8DHV resulted in a good steady 59 signal, and no repeats. Second call into LZ1UBO resulted in a good QSO with unsolicited "Broadcast Audio" report. The Monitor audio from the radio also sounded a good audio signal was being sent into the radio, but listening to yourself is always difficult. I'll organise some recording on my SDR, to see what it does sound like.
The Yaesu FT-847 Mic Gain is now only on 10 o'clock, which is low for any of the other microphones I've got such as the MD200-A8X which needs full Mic gain. On the Yaesu FT-2000, Mic gain is only on 10, but sounds good without going into setting up the processor.
The End
This is a pleasing result to a bit of a crazy idea, but an enjoyable project and an excuse to get the soldering iron out !
Now, what next because I have a spare insert...
Thanks to M0UKD for the initial circuit and work and M1GEO for his write-up of his Yaesu modification.